One of the best-kept secrets in most home kitchens is sitting right in plain sight. Even if you’re aware of your oven’s broiler function, chances are you haven’t fully taken advantage of it. When broiling food, understanding how to use your broiling pan properly is the first step.
There’s more to these little pans than meets the eye, but using them doesn’t have to be complicated. Take a look below to learn how to use a broiling pan, what they are, and what benefits they offer. Once you’ve mastered them, they will add a whole new dimension to your cooking.
Table of Contents
What is a Broiling Pan?
Also called a broiler pan or broiler roaster, this piece of cookware should be in every home cook’s arsenal. Broiling pans are made to withstand very high temperatures and are usually built of stainless steel or heavy gauge steel. Their unique design allows meats to brown evenly without getting too soggy.
Broiling pans are the ideal choice for finishing off steaks and other thin cuts of meat. However, when used correctly, they are also a very versatile piece of cookware.
Anatomy of a Broiler Pan
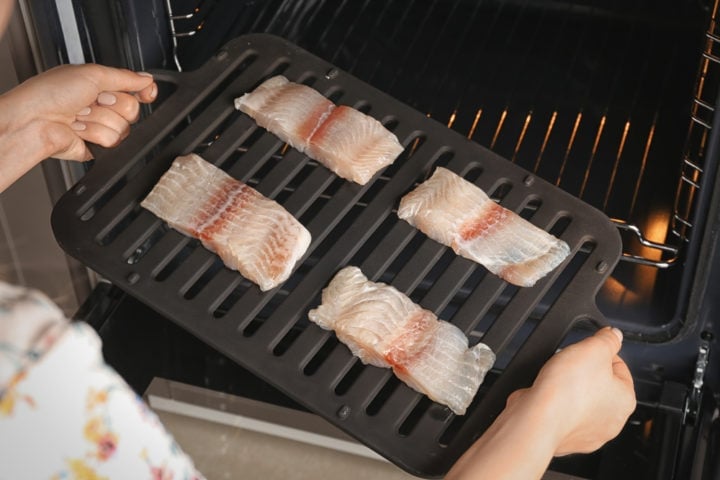
Boiler pans comprise two main sections, a shallow pan on the bottom and a cooking surface on the top. The cooking surface is also known as the plate lid, and it features a series of holes or slits.
These openings allow drippings to leak through, which are caught by the pan below. Generally, the openings on the plate lid are small to prevent the grease below from flaring up.
Broiler pans come in a variety of sizes made to fit all kinds of ovens. You can find them around 6 x 10 inches on the small end, while larger ones can be as large as 12 x 18 inches.
Using a Broiler Pan Step-by-Step
The high heats and dripping fat involved in broiler cooking mean it’s always a good idea to exercise caution. However, once you try it for yourself, you’ll see that using a broiler pan is simple to use.
1. Locate Your Broiler
While it may seem obvious, many oven owners can’t locate their oven’s broiler at all. Part of the confusion stems from the fact that different ovens position their broiler differently.
Most gas ovens have their broiler located in a separate broiler drawer beneath the main oven cavity. At the top of this compartment are open flames which cook the food. At the bottom is space to place your broiler pan.
Electric ovens don’t have separate broilers but include them in the main oven cavity. The heating element used in an electric oven broiling is usually located at the top of the oven. You can check by turning on your broil function and seeing whether you can spot the heating element glowing.
Keep in mind that your oven may not have a broiler at all. If you’re not sure where to locate yours, read your owner’s manual thoroughly.
2. Position Your Oven Racks Carefully
Broiling is a delicate art, and even a small miscalculation can result in food that’s burnt or underdone. One critical factor is the position of your oven rack.
For best results, follow this rule of thumb: Place small dishes further from your broiler to prevent burning. Similarly, place large dishes closer, so they benefit from the extra heat.
Getting the right balance takes practice, so it’s best to err on the side of caution when starting out. Place your oven rack a bit further from your broiler than you might need to, and reposition as needed.
Some gas broilers may not have extra space to reposition your oven rack. However, for those that do, it’s essential to consider this step carefully.
3. Preheat Your Broiler
Broiling is always done best at full heat. To make sure you are squeezing as much power out of your oven as possible, always wait for it to preheat. Failing to do so can result in undercooked meat or a lack of flavor.
A full preheat should take a minimum of five minutes, or ten just to be safe.
4. Load Your Broiler Pan
As noted in step 2, the distance between your oven broiler and your food is a critical factor. This means you should also take into consideration the size and shape of your food.
Most broiled items are thin, like sliced meat, chopped veggies, flatbreads, and pizzas. However, if you have a larger cut of beef or oversized vegetable, be sure to factor this into your rack position.
Generally, it’s better to avoid broiling large cuts of meat unless it’s been precooked. Also, make sure to position smaller pieces of food evenly around the pan to ensure even cooking.
5. Cook!
Once your pan is loaded, you’re ready to broil. Use oven mitts and carefully position your broiling pan squarely beneath the heating element.
At this point, it may seem like common sense to shut the oven door. However, when broiling, it’s usually better to leave open a crack to allow heat to vent. Failing to do so can cause your oven to overheat, especially when broiling for long periods.
Finally, don’t forget to monitor your time closely. Broilers do their work quickly, which means an extra 30 seconds can result in burned food. To be safe, it is a good idea to monitor your food closely and watch for any black spots.
6. Remove and Cool
When your food is fully cooked, put on a pair of oven mitts and carefully remove your broiling pan. Remember that your broiler can heat pans quickly, so even after a few minutes, yours may be pretty hot. Place it on your stovetop or a specialized cooling rack.
More Tips for Using a Broiling Pan
The truth is broiling pans are one of the most underutilized tools in the home kitchen. To make the most of yours, keep all of these tips in mind.
Don't Forget a Basting Brush
If there is any single kitchen tool that pairs best with a broiling pan, it is a basting brush. This simple gadget is excellent for applying sauces and other condiments to food.
The reason why it goes hand-in-hand with broilers comes down to glazing. When sauces are applied to meats or vegetables and then put under the broiler, they quickly caramelize. This will amplify the flavor of your dishes and make them look even better.
Simplify Cleanup
One major downside of broiling pans is that they often require significant cleanup. Since the plate lid is designed to funnel grease, they end up getting dirty in the process.
However, by simply applying aluminum foil, you can save much of the work. Simply line the bottom pan completely with foil and throw it away after it has cooled. You can also place foil on the plate lid, but just remember to poke holes to allow the greatest to drain below.
Mix and Match Cooking Methods
Pan broiling is often most effective when paired with your oven’s other functions.
Pizza is a great example. You can allow the crust to rise and cheese to melt at high heat in your oven. Then, once everything is thoroughly cooked, place it under your broiler for a crispier crust and browned cheese.
Roast meats and vegetables also benefit from a few minutes under the broiler after they’re done cooking. This produces additional browning, which will deepen the flavor.
Try a Broiler Pan Substitute
If you haven’t yet found the perfect broiler pan, you can also try using a cast iron pan or a regular baking sheet. While these won’t drain grease like a real broiler pan will, most are safe to use with your broiler.
The Benefits of Broiling
There are plenty of good reasons to create broiled food at home. If you still need convincing, consider these benefits.
Healthy
Did you know broiling is one of the healthiest cooking methods available in your home kitchen? Since broiling pans drain grease, they lower a food’s calorie count as it cooks. This is a contrast to most other cooking methods, which require added oils.
Flavorful
One of the simplest secrets to delicious home cooking is browning. Simply put, foods that acquire some color during the cooking process come out tasting better.
While frying, roasting, and sauteeing can all get the same effect, broiling stands in a class all its own. The high heats produced by your broiler are hard to rival anywhere except perhaps an outdoor grill. That means they squeeze extra flavor out of every bit of food.
Fast
A simple broiled meal doesn’t need to be more complex than some chopped meats and vegetables. Then, after a few minutes under the broiler, you have a full dinner ready to go. It takes as little time as microwaving but with much more flavor.
Versatile
Once you start using your broiler regularly, you’ll find that you can use it for all sorts of things. Meats and vegetables are classic, but there are plenty of other options: pizza and flatbread, kabobs, fish, poultry, even fruits like pineapple.
How Not to Use Your Broiler Pan
While broiler pans are a versatile tool, it’s a good idea to know their limitations. There are a few ways they should never be used.
Generally, you should avoid cooking large cuts of meat entirely in the broiler. While broiling can put a nice finish on steaks and roasts, they also need precooking to come out correctly.
Also, don’t broil vegetables or other foods that risk burning. This includes smaller vegetables that are already browned, herbs, or dry bread products.
Finally, most cookware isn’t designed for broiler use. This includes glass, cookware with a nonstick coating, or anything with a protective rubber handle. Also, don’t use parchment paper in your broiler.
Broiling Pan vs. Roasting Pan–Know the Difference
Broiling pans and roasting pans share some things in common, though they should never be confused. Each of them has its unique role to play in the kitchen.
While broiler pans are shallow, roasting pans, by contrast, are much deeper. This is because roasting pans are made to hold larger pieces of meat and their drippings. Turkeys, pot roasts, and hams can all be cooked start-to-finish in a roasting pan.
The other major difference is that a roasting pan doesn’t have plate lids. Instead, some of them have wire racks. These are designed to minimize contact with food and maximize air circulation.
Frequently Asked Questions
Now that you know how to use a broiler pan learn how to master the art of broiling. These frequently asked questions should give you a head start.
The most commonly boiled food would have to be meat. Steaks, poultry, fish, and other animal proteins benefit from the high temperatures. In just a few minutes under the broiler, they will develop nicely brown crusts.
Vegetables can benefit in the same way, especially those high in sugar like squash, sweet potatoes, and carrots. However, they often need to be precooked for the best results.
Pizzas and open-face sandwiches are other good options. Here, the broiler can quickly melt cheese and heat all your fillings. Just be sure to monitor them closely to prevent burning!
Some cooks put a bit of water in their broiler tray to reduce smoking. If you find excess smoke to be a problem when you broil foods, this can be a good solution.
However, keep in mind that water creates steam. If your dinner includes bread or crispy vegetables, this steam may render your food soggy.
Leaving your oven door open usually results in loss of heat and possibly a safety hazard. However, when broiling, this practice is a must.
Since broilers generate so much heat, they run the risk of overheating your oven. In newer appliances, this can activate the auto shut-off feature. In older ovens, it can increase the risk of fire.
Leaving your oven door slightly ajar while broiling is the best way to prevent this. Just remember to also crack a window or turn on your fan to vent heat further.
Leave a Reply